Settings
For a quicker handling of your account, go through these links to use the Settings Options in the most convenient way.
<–Back to Help CenterAdding Users to Your Yobi Account
Adding your team members to your Yobi account is what helps you get internal conversations going on while you are on conversations with customers. Having users who share the same number and have access to conversations of clients is a key factor in speeding up every response to them and getting everyone on the same page.
The video below explains it in few easy steps.
- Go to Settings → Manage users
- Click on “Add User” then, fill in the information fields appropriately.
- End the process by hitting “Send Invitation” either via “email” or “SMS”
Adding a Custom Greeting Message
If the video was not of great help to you, these easy steps below will guide you in no time to set up your custom greeting messag.
Once on your Yobi account Go to:
- Settings → Channels and click the Greeting icon.
- Upload your pre-recorded custom greeting in mp3 Or WAV format
That’s it!! Your Custom Greeting is set and your clients are glad to reach out to you every time 😊
Enjoy seamless conversations in one app, Yobi.
Don’t have an account? Sign up for a free trial here
Add a Photo to Your Profile and Contacts
Personalize your entire experience with Yobi, get pictures on your profile and that of your contacts. Make business more fun 😉 and more like You!
For profile
- Go to Settings → Profile
- Click the upload button to upload a profile photo
For Contacts
- Go to Contacts
- Click on the contact of your choice to add a picture
- Upload a photo for your contact
Archive Messages
Organize your inbox and archive old messages.
Watch video above on how simple archiving is with Yobi.
Recording Calls
Call recording is turned on by default for your Yobi account.
To turn it off when logged into your browser or desktop:
- Select Settings from the left menu
- Go to Channels and click on edit to toggle ON/OFF the call recording
Watch here:
To turn call recording on/off when logged into mobile:
- Select Settings from the left menu
- Go to Channels and click on edit to toggle ON/OFF the call recording
Watch here:
Call Transfers
Transfer Yobi incoming calls to anyone from your team.
Make sure you’ve added your team as User/Admin to your account. Here’s how:
While on an inbound call, click on the Transfer button to choose the team member you would like to transfer your call to.
Once they’re connected, you can now end your call and they will continue their conversation from there.
Watch how it works:
How to activate call forwarding
Call forwarding allows you to redirect incoming calls to a number that you choose.
To activate call forwarding, follow these steps:
Click on your avatar → channels → my channels → the phone number you wanna forward from → edit.
You’ll move to a view that allows you to edit channel information. click on “Add number” beside “Forward calls” and type in the number you want to forward to.
Call Transfer and Merging:
This features allows you to transfer incoming calls to anyone from your team (users in your account).
Make sure you’ve added your team as User/Admin to your account. Here’s how: To add a team member to your account, check out this article (link to article on adding users).
While on an inbound call, click on the Transfer button to choose the team member you would like to transfer your call to.
Once they’re connected, you can either:
- end your call and the caller and your team member will continue their conversation from there
- Stay on the call so you, your team member, and the caller can be on the same call.
Watch how it works:
Merging Calls:
With Yobi, you can merge any incoming calls after completing the Transfer as explained above.
All you need to do next is click on Merge Icon. There you go you, a teammate and the caller are all on one call
Don’t have a Yobi account yet? Sign up here for a free trial! (link to signup page)
Setup a Custom Voicemail Message
Here’s how to add a custom voicemail message:
- Log in to your Yobi
- Go to Settings then Channels and click the Voicemail icon
- Upload your pre-recorded custom greeting in .mp3 or .wav format
That’s it!
Do Not Disturb
Yobi offers you a Do Not Disturb mode which when activated, suppresses all incoming calls and message. You'll still be able to receive messages and calls just as normal but ringing will be disabled besides that notifications won't be shown.
How to activate do not disturb ?
Click on your avatar → Toggle the Do Not Disturb switch to activate/deactivate it.
Business Hours
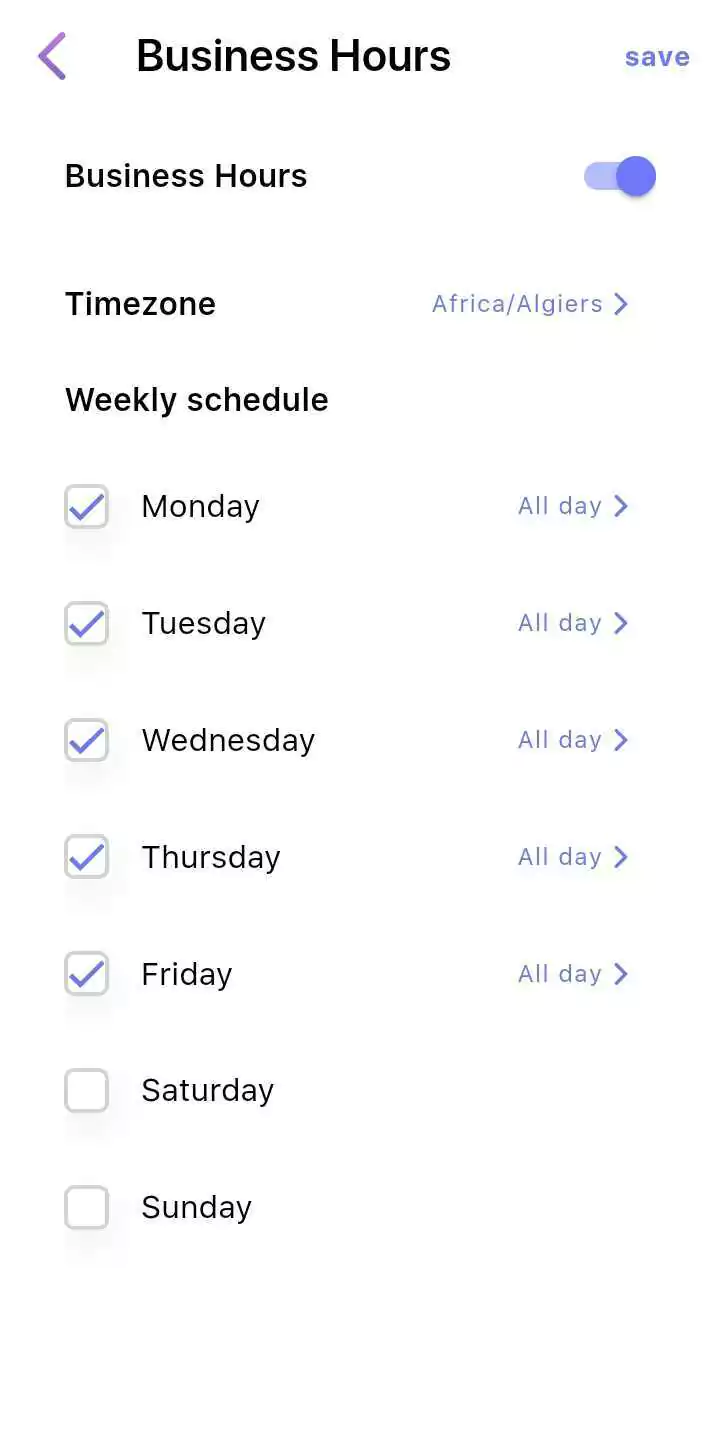
Business hours is one of Yobi’s most useful features. It allows you to receive calls and messages only on a previously defined time span which corresponds to your business’ working hours.
To activate business hours, follow these steps:
Click on your avatar → Channels → My channels → Click on the specified number → Business hours
You’ll get to this screen:

Clicking on a specific day allows the set up for Business Hours for the day in question. You have three options to choose from:
- All the day
- Day off
- Selected times
For web and desktop applications, Follow this video: